Pages

Showing posts with label regular. Show all posts

Friday, January 20, 2012

Smoky Sausage and Veggie Lasagna

I grew up with vegetarian lasagna. My mom always kept it simple with a classic cheese version or occasionally a spinach twist. My meat eating husband has a hard time understanding why any meal would ever go green so I often work to make some sort of compromise sneaking in extra veggies while not eliminating the meat. My newest take on a classic lasagna featured a smoky andouille sausage and eggplant base with a spinach laden cheese layer and my favorite whole wheat no boil noodles by DeLallo. The result was a super rich and thick lasagna that didn’t make me feel like I also needed to serve a veggie on the side.


DeLallo 100% Whole Wheat No Boil Lasagna Noodles
1 jar of pasta sauce
1 160z package of shredded mozzarella
1 8 oz container of ricotta
Shredded Parmesan
1 egg
1 frozen spinach, defrosted and drained of access water
1 eggplant
3 cloves of garlic, minced
6 mushrooms (I used crimini)
½ zucchini
1 tsp Italian seasoning
2 pork andouille sausages
2 tbs EVOO

Peal and chop eggplant, mushrooms and zucchini. Heat EVOO in a large saute pan, add garlic, Italian seasoning and vegetables to the pan. Add the sausage (without the casing) and saute for 5-10 min or until the eggplant has browned and broken down and the sausage is cooked. In a small bowl mix together ricotta, ¼ c Parmesan, egg and spinach and set aside. Cover the bottom of a 9x13 baking dish with a thin layer of sauce, place one layer of noodles on top of the sauce, cover noodles with the spinach and cheese mixture, then a layer of the eggplant and sausage mixture and a layer of mozzarella. Start the process over again and finish with a layer of noodles, sauce and a mix of mozzarella mixed with extra Parmesan.

Bake in a 400 degree oven for 40 min covered and another 20 min uncovered.

Thursday, January 19, 2012

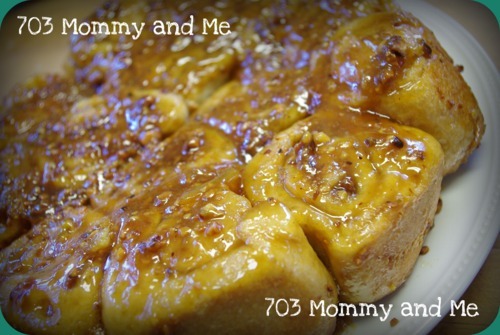
Tangerine Pistachio Sticky Buns

Tangerine  Pistachio Sticky Buns

I saw this recipe in the Martha Stewart Everyday Food Magazine and had to try it. While the store bought dough was not nearly as delicious as the homemade version we made last year the level of effort made up all the difference. They were a great addition to our Christmas morning brunch but since I am a sucker for cinnamon I might have to try this time saving trick with the classic version again sometime soon.

½ c dark brown sugar
½ c shelled unsalted pistachios
5 tbs unsalted butter, melted
all purpose flour for work surface
1.5 lbs pizza dough
⅓ c marmalade (there was actually a recipe for homemade marmalade  that came with it but I opted for the store bought version to save time.)
course salt

In a food processor pulse brown sugar and pistachios until ground. Sprinkle the bottom of an 8 inch round baking dish and then drizzle with butter. Roll out pizza dough on a floured work surface. Dough should end up in a rectangle about 12x18. Spread with marmalade leaving a 1 inch border. top with remaining sugar mix, sprinkle with salt and drizzle with butter. Roll the dough starting at the long edge until it resembles a jelly roll. Cut crosswise into 8 pieces and place in pan. Cover and let it rise for about an hour. Preheat oven to 350, place pan on baking sheet and bake for 35 min or until buns are golden brown. Cut around the edges and flip. Serve warm.

Wednesday, January 18, 2012

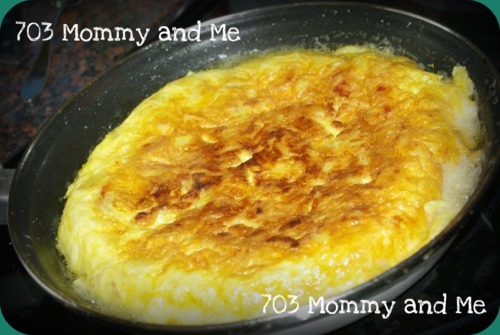
Sandy's Spanish Omelet

 This tasty treat has been a staple at our tailgates, parties and now brunches since Sandy came into our lives. We thank her for it and gladly scarf it down every chance we get. Its super easy, delicious and my boys cant seem to get enough so I have a feeling Ill be making it for years to come.

6 eggs, beaten
6-7 yukon gold potatoes
½ onion, diced
2-3 C EVOO for pan frying
salt to taste

Peel and cut the potatoes into thin slices or chunks. Mix the potatoes, diced onions and salt in a large bowl. Heat EVOO in a large non stick frying pan. Pour potato and onion mixture into the pan and make sure the EVOO almost covers the mixture. Cook the potatoes until they are soft, stirring occasionally to make sure they do not burn. If you are unsure if the potatoes are done try to break one with your spatula. If it breaks easily they are cooked. Reserve 1-2 tbs of oil at the bottom of the pan. Remove potatoes with a slotted spoon and allow the oil to drain. Scramble eggs with a whisk and pour in the potato mixture. Stir the egg mixture and pour into the hot pan helping it to spread out evenly. Allow the egg to cook well around the edges until you can carefully scoop it up and check for a browning on the bottom. The inside of the mixture should still be runny. When the desired consistency has been reached take a large plate (larger than your pan) and place it on top of the pan, with one hand on the handle of the pan and the other on the plate, flip pan over and the omelet will fall onto the plate. Place pan back on the range, add a bit more oil to cover the bottom and slide the egg mixture, soft side down, into the pan. Use your spatula to shape the omelet back and cook for 3-4 more minutes. Turn the heat off and let the omelet stand for an additional 2 min in the pan then flip back onto the plate and serve.


This omelet tastes great hot or cold, it can be sliced like a pie or eaten in squares with tooth picks.


I linked this awesome recipe up with A Little Nosh for her Tastetastic Thursday

Tuesday, January 17, 2012

Trendy Tot Tuesday: Week 1

 I definitely have my own style. I am not saying I am stylish, but I roll with it. I would call it comfy classic with a bit of mama chic mixed in. When it comes to my favorite little dude I prefer a slightly more hip version of my same style. I am a sucker for a good pair of overalls but I also cant help but dress the little guy up from time to time. The kicker is, I am a thrifty mama. I almost exclusively shop at discount stores or outlets and even then I usually buy things from the sale or clearance section. I like to think its my good strong Scottish roots that keep me thrifty but in reality it might just be that I am cheap.


I know I am biased  but B really is an adorable kid and I think we put together some good looking outfits for shopping on a budget so when my friend Maria from Mummy’s Busy World and Very Busy Mama approached me about sharing little B’s style for her Trendy Tot Tuesday link up I jumped at the opportunity. So here we go, my first attempt at Trendy Tot Tuesday

Lil B’s Style: It sure is some sorta style


Hat: This is our favorite winter accessory and by ours I mean MINE. It doesn’t matter where we are, the park, the store or just out for a jog someone always complements us on it. Its super warm, soft and bonus, its so bright I can’t loose my kid if I tried. Chaos Little Things Hat: http://bitylink.info/gul
Puffer Jacket: OshKosh B’gosh outlet
Shirt: Manchester United Soccer Jersey with a long sleeve white onesie underneath to keep him warm
Pants: Carters Sweatpants
Shoes: Adidas kicks 60% off from the Syms going out of business sale!


Monday, January 16, 2012

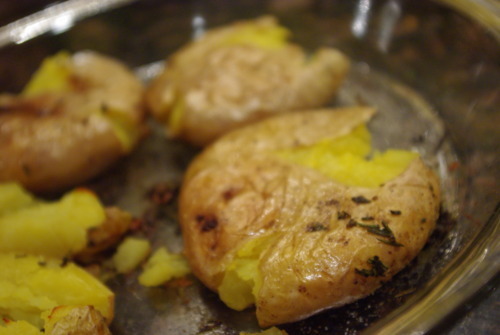
Garlic and Rosemary Smashed Potatoes

These smashed potatoes are the perfect mixture of crunchy roasted and soft mashed ones. The original recipe comes from America’s Test Kitchen which is a rocking publication for aspiring cooks. The recipe is super simple and lets face it, I love to smash things!

Yukon gold potatoes
EVOO
Garlic cloves, thinly sliced
Rosemary, chopped
Salt and pepper

Set oven to 400. Pierce potatoes in several places and insert garlic slices into the potatoes. I did 3 or 4 slices per potato. Roll potatoes in EVOO, sprinkle with salt, pepper and chopped rosemary. Bake the potatoes for 30 min or until soft. Smash each potato once with a large fork and continue to bake for 10-15 min.

Thursday, January 12, 2012

Roasted Garlic and Goat Cheese Mashed Potatoes

Mashed potato heaven could describe this truly decadent dish. I love strong flavors and the mix of the sweet roasted garlic and tangy goat cheese really takes these mashed potatoes to a whole new level. I think I could eat them forever.

6 yukon gold potatoes quartered
2 tbs butter
¼ c milk
½ head of roasted garlic (Id probably do more next time because I LOVE garlic)
6 oz goat cheese

Boil potatoes until they are soft. Strain and mash. Mix in the other ingredients and serve. DELISH!

Wednesday, January 11, 2012

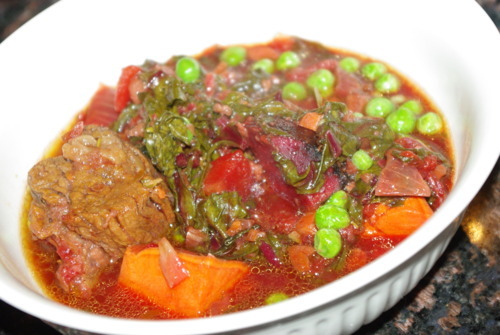
Rainbow Beef Stew

Traditionally beef stew recipes call for potatoes and carrots and onions as the veggies and then it uses a strong tomato base to pull all the flavors together. Since I am in a super veggie, post holiday pig out mood I decided to shake things up a bit and give a few more of my favorite winter veggies a try. Toady’s beef stew features sweet potatoes, beets (including their tops), carrots, celery, onion, garlic and tomatoes.
While the highlight of beef stew is usually the beef I am switching it up to highlight seasonal winter veggies making this a more economical and healthy family friendly dish.


1-2 lbs of stew beef- bonus, I had some in my freezer from the last sale at WF!
1 c flour
½ c EVOO
1 lb sweet potato chopped into 1 inch pieces
3 Beets, washed and chopped into 1 inch pieces (tops saved)
½ head of garlic, chopped
½ onion, chopped
1 c chopped carrots
1 c chopped celery
1 can diced tomatoes
1 c dry red wine
2 c stock - beef is preferable but I used chicken because I had it in the freezer
½ tsp red pepper flakes (omit if you do not like spice)
1 tbs kosher salt
Fresh thyme and rosemary
bay leaf

Place flour and meat in a large Ziploc bag and shake until covered. In a large pan heat EVOO and brown meat. When meat is brown place in crock pot. Use the same pan to cook onion and garlic until tender (about 10 min) and then add cooked aromatics to the crock pot. Pour wine into pan and scrape up any drippings left from the meat and onion mixtures. Add the wine and the rest of the ingredients (except for the beet tops) to the crock pot. Cover and cook on low for 7-8 hours or on high for 4. 

Tuesday, January 10, 2012

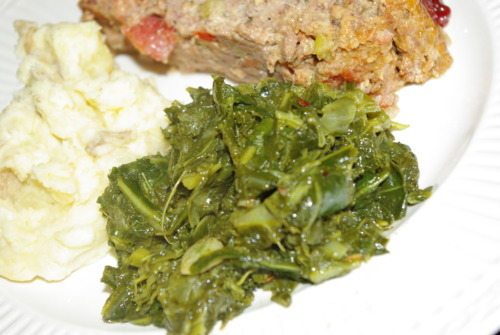
Quick Greens

Winter gardens bring dark greens and root veggies. They are nutrient rich, budget friendly and when cooked down become a super soft consistency perfect for baby, toddler and adults too. Yes, greens are an acquired taste, but I really love them. I grew up on kale and spinach and was introduced to collards and chard later in life. Now they all grace my table on a regular basis in soups, salads and sides galore.


Collards are traditionally cooked low and slow but I don’t always have time for that so this recipe for quick greens is a great way to go when I’m in a rush. 

1 bunch of greens washed and chopped
2 cloves of garlic thinly sliced
EVOO
1-4 tsp red pepper flakes


Dressing:


1-4 c apple cider vinegar
1 tbs brown sugar
Salt to taste

Bring pot of water to a boil. Boil greens for 10 min. Strain and set aside. Heat oil in pan and saute garlic until it begins to brown, add greens.
Cook greens down, stirring every couple of min for 10 min. Add dressing and mix til incorporated. Serve warm.

Monday, January 9, 2012

Sandy's Paella

Paella

Our friend Sandy is a phenomenal cook, her Spanish roots see to that. She makes some  amazing paella as well as a Spanish Omelet that is to die for. On top of being a great cook, she loves wine, discussing food and well lets face it, shes just plain fun. I am so happy that I have gotten to know her better and I can’t wait for our next dinner date!  Because she is also amazingly gracious, she agreed to let me share a couple of her favorite recipes with you, my lucky readers. First up is her delicious paella. You can thank me/her later.

Paella is a great one dish wonder that is perfect for large group dinners. Its bright vibrant color makes it perfectly festive and the flavors transport you instantly into vacation mode.

Calamari (cleaned and cut)
Shrimp
Chicken
Chorizo
Scallops
Mussels
Clams
3 c Rice
1 onion chopped
4 garlic cloves chopped
1 can crushed tomatoes
2 large chicken stocks
Generous pinch of saffron threads (Trader Joe’s has it for a decent price)
½ bag frozen peas


For this recipe you will need a large paella pan or skillet that can be placed in the oven. The amount/type of seafood and meat you use can be up to you. Traditionally paella has shrimp in it but I am allergic to shrimp so Sandy sweetly accommodated my allergy and left them out. The sad thing is I LOVE shrimp and can totally imagine how good they would be in this wonderful dish.

Clean and prep all seafood. Steam mussels and remove one ½ of shells and set aside. Cut chorizo and chicken into chunks. Pour stock into a pot with saffron and bring to a slow boil. In a separate pan sautee onion and garlic with some olive oil to make the sofrito or the base flavor for the dish. Once the onions have begun to caramelize add the tomatoes. Fold in the rice until it is coated with the mixture and begins to toast. Mix the chicken and chorizo into the rice. Pour in 6 cups of the stock into the rice mixture and stir for 10 min until the rice begins to absorb the liquid.  Add seafood tucking each piece into the rice by pushing it down with a spoon. Bring the entire mixture to a boil and then add frozen peas. Place the pan into the oven and cook for 30 min at 350.

Before serving sprinkle with chopped parsley and serve with fresh lemon wedges for some added flare.

Friday, January 6, 2012

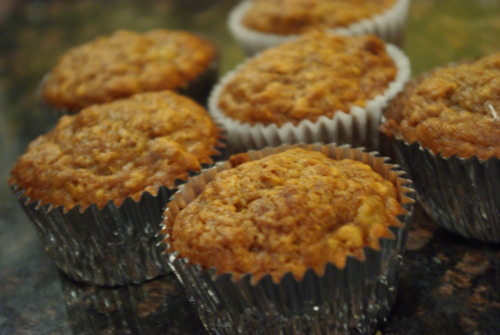
Oatmeal Banana Nut Muffins/Bread

Fresh baked goods are the best.They make the house smell yummy and they are the perfect treat with my cup of coffee in the morning. These delicious muffins are packed with nutrient rich calories that can keep you going all morning long.

We always have bananas in the house since B eats one every morning for breakfast. I personally like mine a big on the green side and can not stand to eat them once they get more than a couple brown spots. Since we don’t always make it through the bunch before they get overripe I have taken to freezing the extra ones. They do turn brown and when you defrost them they are super mushy but they still work well for things like banana bread and smoothies (Ill have to share my frozen banana smoothie recipe later.) Waste not, want not! This recipe is an adaptation from Boston’s own Flour Bakery which I love!


1 ⅔ c flour
½ C quick oats
1 tsp baking soda
¼ tsp cinnamon
½ tsp salt
1 C sugar
2 eggs
½ c apple sauce
3.5-4 ripe bananas, mashed (I used 4 frozen)
2 tbs yogurt (I use Brown Cow Maple Whole Milk Yogurt)
1 tsp vanilla
⅔ c walnuts, toasted and chopped

Set the oven to 350 and spray or line a bread pan or muffin tins.

Defrost and drain frozen bananas (if using frozen.) Sift flour, baking soda, cinnamon and salt together. Beat sugar and eggs together with a whisk until light and fluffy. Drizzle in oil applesauce. Add mashed bananas, yogurt and vanilla. Fold in dry ingredients. Pour into a loaf pan and bake for 45min to an hour or 30 min for muffins.
If you are interested in the original recipe for Flour Bakery Banana Bread please click here.

Thursday, January 5, 2012

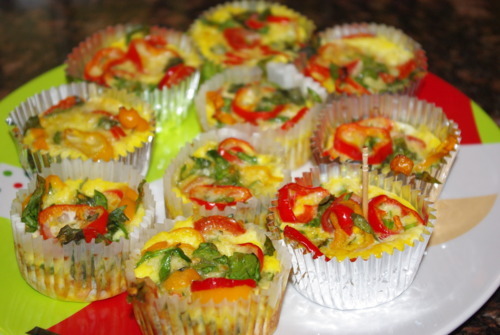
Mini Veggie and Cheese Frittatas

Isn’t breakfast the most important meal of the day? These super easy, and perfectly portioned frittatas are a great way to get a protein and veggie packed meal in as you are dashing out the door or make a great post sleep over party brunch. I use to make a pan of these on Sundays when I was working out of the house so that I could have breakfast ready for the week. I might not be dashing off to beat traffic anymore but I should resume that old habit so I can dash off to chase little B down again.


The best part about these is they are super healthy and totally toddler friendly.


if you are wondering why one has a tooth pick in it. I had a dairy free guest so I made one sans cheese and marked it with a pick while baking.


Personal Veggie Frittatas
EVOO
Frozen hash browns, thawed
6 eggs
1 tbs milk
1.5 c chopped veggies of choice (I usually use a mix of peppers, tomatoes, spinach, mushrooms, summer squash and fresh herbs)
½ c shredded cheese
S&P

Rub muffin tins with EVOO. Cover the bottom of each tin with a layer of potato hash browns. Mix eggs, milk, S&P, cheese and veggies together and pour equal amounts of the mix into each muffin tin. Bake for 10-15 min at 350

Wednesday, January 4, 2012

My Brother the Ape at the Natural History Museum

We love the They Might Be Giants children’s music. B’s first album was Here Comes Science which features his jams My Brother the Ape and I am a Paleontologist. Since he loves his science, and running around so much we headed over to the Natural History Museum to show him science in action.

He really loved the large mammal room and being able to get up close to all the different animals but the dinosaurs and the ocean life were a close second. I loved having the space for him to run and showing him all the different interactive exhibit pieces. There were “fossils” to touch, electronic and mechanical exhibits to work and we even got his picture taken and then turned into a cave man (hilarious.) I was extremely nervous to take him around at such a young age but once we got there I realized it was the perfect place for us to cruise and learn. Since we are going to be looking for lots of indoor activities to keep us moving this winter I think next up on our museum tour will be the Air and Space or American History museum.

being a giraffe- they have long tounges

Tuesday, January 3, 2012

Pumpkin Mushroom Soup

Once the crisp fall air hits I begin to crave pumpkin in everything I do. I am certain that the craving doesn’t end before the crocuses bloom so I am still knee deep in my favorite pumpkin recipes. Pumpkin, like other winter squash varieties is super sweet and delicious and have a bonus of being high in the vitavegamins.


A couple of weeks ago, my dear friend Shannon put together a fantastic Christmas play dates for a few of our friends. We had a wonderful time catching up, playing baby games and filling our bellies with delicious holiday treats. One of the yummiest was a wonderfully rich pumpkin mushroom soup that she had purchased from the Back Porch Restaurant in DE, brought home and froze just for us. When I say this soup was decadent I mean it. The perfectly creamy pumpkin laced with the deep umami flavors of the shrooms had me at hello.

Since I couldn’t get the soup out of my head I thought I would try and whip up my own version to see if I could get close to the flavor I was looking for. The version that I ended up with is a bit different but yummy all the same. It was super quick and easy to make and as Shannon pointed out, it would totally be a perfect way to start out a festive holiday dinner in the future.

Pumpkin Mushroom Soup

¼ c Chopped celery
½ c Chopped onion
¼ c Chopped carrot
4 tbs Butter
2 tbs Flour
1 tbs Cumin
3 c Homemade chicken stock
16 oz of fresh pumpkin (baked and strained) or 1 can Pumpkin (not pie filling)
2 tbs honey
Dash of nutmeg
½ lb Sliced mushrooms (I used crimini)
1 c Heavy cream
Salt and Pepper

In a stock pot saute celery, onion and carrot in 2 tbs butter until soft. Add flour and stir until incorporated. Add cumin, stock, pumpkin, honey and nutmeg and blended using an immersion blender. (if you do not have one you can always blend in a traditional blender and then pour it back into the original pot to continue cooking.) Saute mushrooms in the remainder of the butter until they are soft and stir them into the soup with cream. Simmer and flavor with salt and pepper.  

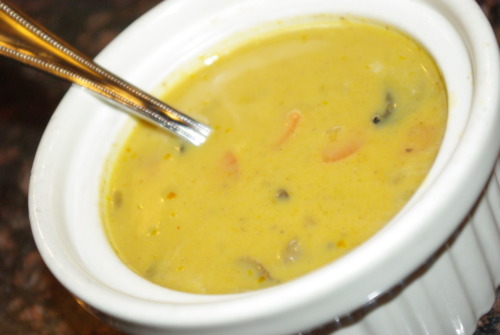
*The version that is pictured was done without the blending. The result was a chunkier version of the soup where you could pick out the pieces of carrot, celery and onion. While delicious, I much preferred the super smooth version I had at Shannon’s so I thought the blending would definitely be worth the extra step. My recipe research did lead me to find several versions of this soup that did not include the trinity veggies (onion, celery and carrot) but I really love the extra flavor they bring so I almost always use them when making soups. 

Friday, December 23, 2011

Ray's Steak and Cheese, now @ Ray's to the 3rd

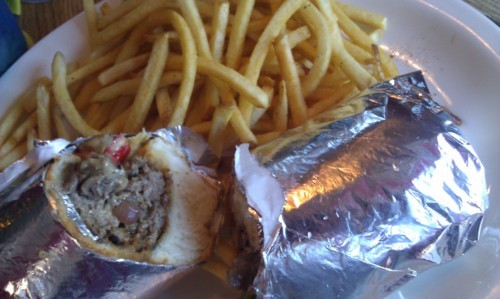
Well the time has past on Ray’s Steak and Cheese joint. As quickly as it came, it went. The steaks were delicious and I wish I could kick and scream to bring it back but I have a feeling I don’t have much pull. I am however excited that Ray, has decided to keep his most awesome sandwich on the Rays to the third lunch menu so that we can continue to enjoy it for years (hopefully) to come.

They offer their sandwiches with American and provolone, lettuce, tomato and your choice of mixed greens or fries. Several toppings including onions, peppers and mushrooms can be added on for an additional charge. I have never been to philly and I didn’t have my first cheese steak until I was in my 20s but let me say that since then I have become quite the convert and this one definitely ranks up there for me.

Behold its deliciousness:

As far as family friendly goes I think this joint has it down. Its just classy enough to have table clothes but totally has the family feel. While we were eating lunch several other tables with small children came and went with everyone looking like they enjoyed themselves. There were several high chairs (with working safety belts) but I will say that I do not remember seeing a changing table in the bathroom. If I am wrong definitely let me know.

Wednesday, December 21, 2011

Holiday Card Displays

Snail mail makes me happy. Especially around the holidays when we are getting all sorts of fun cards in the mail. Don’t get me wrong, I love the convenience of electronic mail, invitations etc but there is just something so fun about actually receiving and opening an old fashion letter. Its totally a dieing art but one that I support with all my heart.

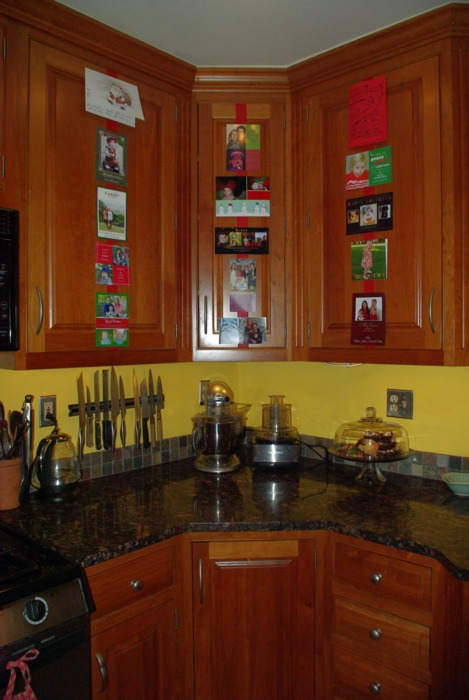
Since someone obviously took the time to create and send their holiday wishes I am always looking for new ways to display and use the cards we receive. This year we did a photo montage on our kitchen cabinets which was super easy and has provided hours of fun for little B to entertain himself with. All you need is a roll (or two) of your favorite holiday ribbon, scissors and tape and you are in business.

If we had a larger house I would totally do a Christmas tree decorated with just lights and holiday cards next year. How fun would that be!

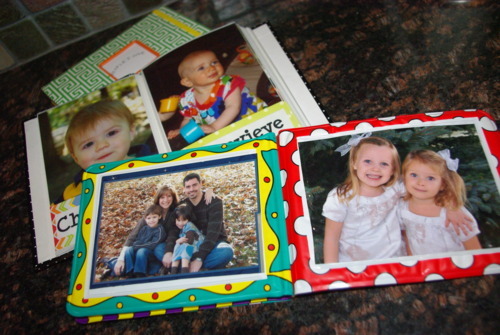
Taking it a step further, save your holiday cards and and turned them into a “who loves baby” or “babies first friends” photo album. Pick up a cheap dollar store photo album and place each photo card in a slot with the names of your little ones friends and family under the pictures. You may have to trim the cards to fit them but it makes an adorable reminder to keep around for the whole year. Little B has several books like this that he adores looking through on a daily basis.

Tuesday, December 20, 2011

Thai Curry Basil Beef

During the last trimester of my pregnancy I was a Thai eating machine. I probably ate Thai at least twice a week and a majority of it was curry. I ate red, yellow, green and panang. I ate it with chicken, beef, pork and veggies. The hubs actually got so tired of our usual place that we branched out and began to make our way through all the Thai restaurants on the Washingtonian best bites and cheap eats lists.


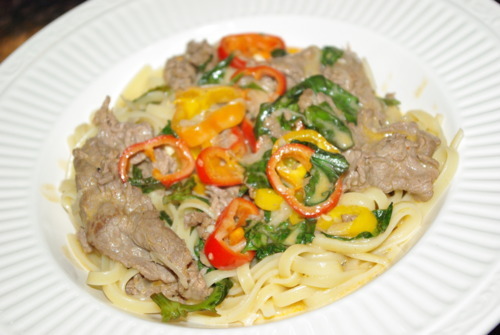
Since my love affair with curry has continued post pregnancy it only makes sense that I have learned a couple of good recipes for it. This basic beef recipe is one of my favorites since I tend to go for rice when I have a choice I was surprised to find out how much I really enjoyed the noodle version as well.


Curried Beef Noodles
1 lb boneless sirloin steak, cut into 1/2 in thick strips
2 T canola or veg oil
2 t red curry paste (I use the Thai Kitchen brand)
3/4 t kosher salt
1/4 t ground pepper
1 pkg of linguine (I usually use whole wheat)
1 can coconut milk (I use the light)
1/2 t sugar
1 c loosely packed basil leaves (or more if you have it)
lime wedges
2 T soy sauce
1/2 onion thinly sliced
add any other veggies you like (I usually add peppers, spinach, eggplant something like that)

Place steak in 1 T of oil, curry paste, salt and pepper in bowl and marinate in fridge for at least 20 min up to overnight.
cook noodles in boiling salted water until al dente, drain and set aside
Heat 1 T oil in wok or skillet over medium high. Add onion  and stir fry 3-4 min. Add steak and stir fry until browned all over 2-3 min.
Reduce heat to medium, stir in coconut milk, soy sauce and sugar; bring to a simmer. Add other veggies and cook until sauce thickens (2 min give or take). Stir in noodles, basil and Spinach (if you are using). Simmer for 30 sec and serve with lime wedges and sriracha.

Monday, December 19, 2011

More Choo Choo: Union Station Holiday Trains

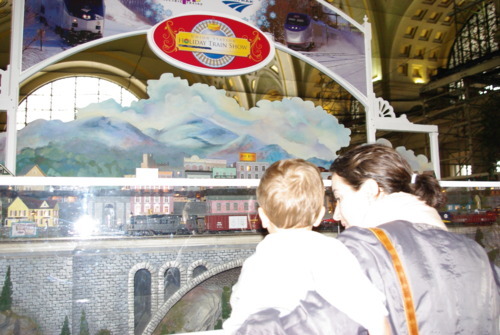
As promised, a little more info for our model train enthusiasts in DC. Since we are between class sessions right now and desperately needed a way to let off some steam B and I headed over to Union Station to check out their holiday train display and grab some lunch with friends.

Union Station has two different displays set up, one that is set up on the floor with plexiglass around it that is perfect for tiny tot viewing and another larger display that is up on tables and protected by a gate. The lower level display featured four trains circling through the mountain tops and towns and the larger table top display featured another five or six trains circling around towns. The displays also offered a good amount of reading material for older children and adults and even offered information on where to purchase some of the models. Another highlight of the day was enjoying the view of the trains arriving and departing from the windows next too the parking deck. Who would know sitting in the freezing cold could be so much fun. The holiday display is free and open to the public through January 2nd. There is plenty of parking (although it is costly) so a cheaper option would be to look for limited street parking or take the metro in.

Lil B sporting his Santa’s little train conductor look


The display is not nearly as exciting as the one at the botanical gardens but if you have a little one who is into trains and you are looking for an outing you might consider taking the metro to Union Station, going to the gardens first and then walking back to do the Union Station display and lunch before heading back home.


Friday, December 16, 2011

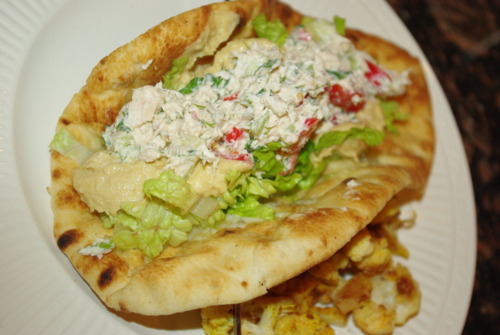
Slouvaki Chicken Salad Pitas

Right after I gave birth to our darling baby boy, my good friend Amber set up a meal delivery schedule for us through takethemameal.com. I know I have posted about how wonderful it was to not have to worry about our meals during those first few weeks but what I have not posted about is how great it was to also get so many new meal ideas from my friends and family.

This recipe is a version of the super yummy chicken salad that my sister-in-law Jess brought us. I have made her version (which I will post below) several times but since I am still on mission clean fridge I made several deviations this time.


1 cooked chicken breast (I used one breast from a whole bird I roasted today)
½ c Dill dip (recipe to follow)
½ lemon (juice only)
Small handful of dill, basil, chives (chopped)
1 shallot finely chopped
1 c bell peppers chopped
1 c grape tomatoes chopped
1 c cucumber chopped
Fresh ground pepper
Flat breads

Place chopped chicken, veggies and herbs in a mixing bowl. Mix in dip, lemon juice and pepper until it is completely incorporated. Serve or refrigerate.

Tonight I served the chicken salad on warm garlic nan bread with melted dill Havarti, lettuce and globs of hummus. As a side I roasted cauliflower from the veggie tray sprinkled with paprika, curry powder and a little bit of EVOO. B ate globs of chicken salad, and dipped chunks of cheese and cauliflower in hummus.


Jess’ Original Version
~1/4 cup EVOO
1 clove garlic grated
Juice of 1 lemon
1 Tablespoon white wine vinegar
S&P
1 cup reduced fat or fat free Greek yogurt
A small handful each of finely chopped dill, parsley and chives
A few dashes hot sauce
1 rotisserie chicken, meat shredded or 1 lb. cold cooked shredded chicken
1 small red bell pepper, chopped
1 small red onion, chopped
1/3 cucumber, chopped
2 ribs celery from the heart, thinly sliced
2 plum tomatoes, diced
flatbread

In a large bowl, combine EVOO, garlic, lemon, vinegar; season with S&P. Stir in the yogurt, herbs, and hot sauce. Add the chicken, bell pepper, onion, cucumber, and celery; season with S&P. Top the salad with tomatoes and serve with flatbread.

** I actually made a dairy free version of this recipe while I was a dairy-free nursing mom. To do this replace the Greek yogurt with So Delicious Plain Coconut Yogurt. The result is a slightly sweeter and lighter version of the original but delicious all the same.

Thursday, December 15, 2011

Holiday Handprint Art

When it comes to holidays and religion we probably fit best into the suma category. Some of this, some of that. My Japanese mother grew up in a Buddhist family, my mid-western father grew up in a Presbyterian household, I identify myself as Christian but I didn’t form that identity until I late in high school. To throw another ingredient in the mixing bowl of life I went ahead and married a wonderful man of eastern European Jewish descent and created a beautiful baby boy who is going to be one confused little cookie when he is asked to check boxes someday.


I tend to get myself in a tizzy trying to think of creative, crafty and yet not tacky ways to decorate my home for the holidays so I was super excited to try out my newest hand print art idea to represent the holidays that represent our family this time of year. They were both super easy, and fun and would make great family gifts “painted” onto cards, in frames or even on shirts for a loving (and not embarrassed grandparent) 


Behold, B’s tubby little hands (and finger tips) as a lit Hanukkah Menorah


and again, as a Christmas wreath. (this one did NOT photograph well)

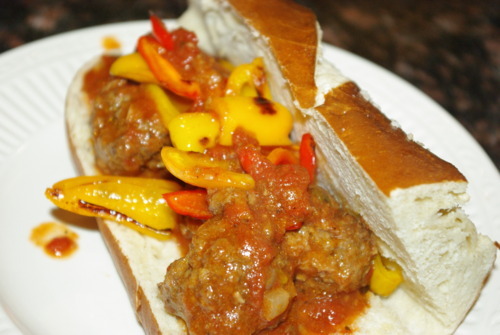
Meatball Subs

Who doesn’t love a nice warm Italian style meatball sub? This is one of the best ways to use your extra meatballs in a new way.


Meatball Subs with Peppers (onions and cheese)

1 small baguette (I used a pretzel baguette)
Meatballs and sauce (enough to fill each sandwich)
bell peppers, sliced
onion, sliced
Cheese slices
EVOO

After our spaghetti and meatball dinner on Sunday I froze the leftover meatballs and tomato sauce in a quart size ziploc bag to make sure they would stay fresh. I threw them in a saucepan on medium heat to defrost waiting until the sauce was boiling and the balls had separated. While I was waiting I chopped up a handful of the peppers and a quarter of an onion and sauteed them in a pan with a little EVOO. I placed about half the balls on each sub, covered with peppers onions and cheese (only peppers for the hubs) and then drizzled a bit of the extra sauce across the top. I actually threw mine in the microwave for 15 seconds to help the cheese melt but the smarter way to do that would be to put it in the toaster oven. B got his share of meatballs, peppers and bread, he is really into deconstructed meals these days.